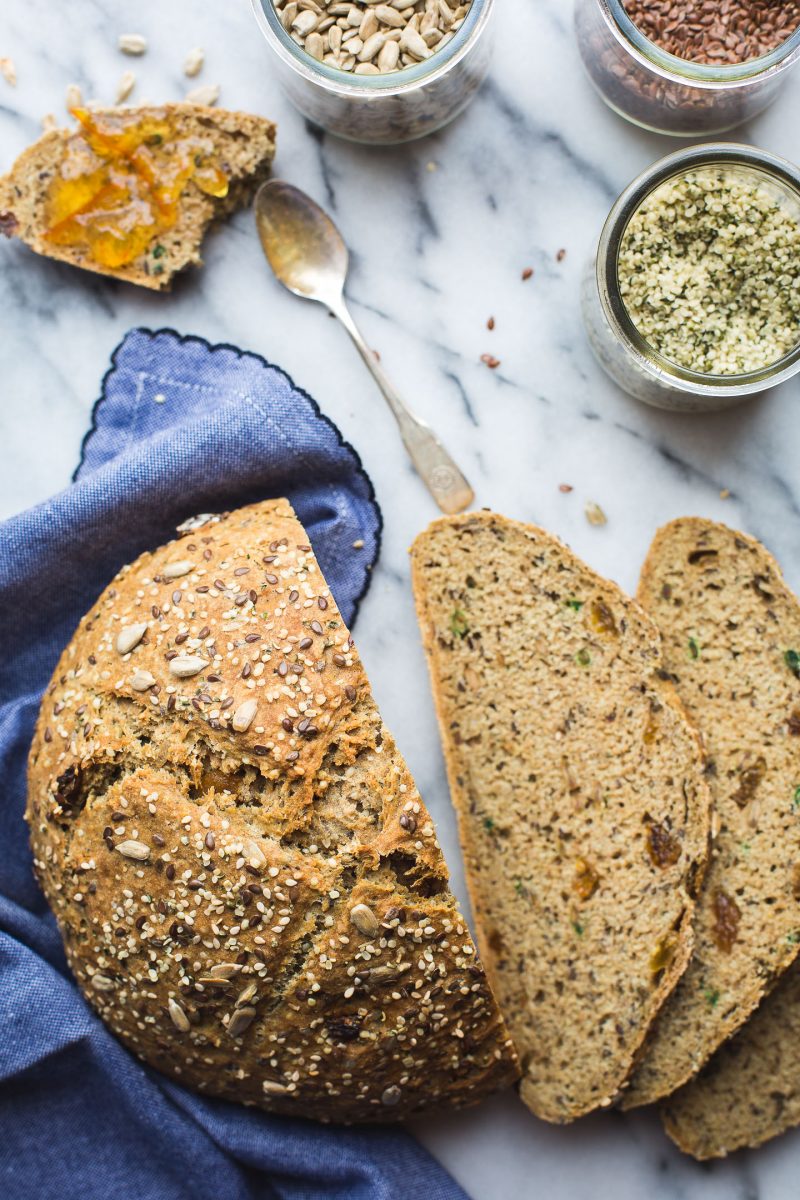
Hummus…and a Giveaway!

Hummus
Hummus

If you’re at all familiar with the movie, My Big Fat Greek Wedding, you must remember the “Mooscaca” scene! You can watch it here (@ 3:00 is the scene I’m talking about). That was my childhood! Being Armenian with a family from Egypt, my Mother didn’t know anything about Wonderbread. Or any sliced bread, for that matter. All of our sandwiches were on pita bread. And many times, there was hummus in that pita. This was over forty thirty years ago (hey, stop trying to do the math!). No one in suburban New Jersey was eating pita bread or hummus for lunch. Except for me. I would beg my Mom to just buy Wonderbread. “Pleeeeeeaaaase can I just take a peanut butter and jelly on Wonderbread!” She’d reply “Hokees (sweetheart in Armenian), why would you want to eat that when this is so good?” Sigh. I’d cringe as I looked into my lunchbox. I can remember trying to find a way to eat the sandwich without taking it completely out in plain sight. I will say, no one teased me about it. They did ask me what the heck I was eating and that alone was all I needed to develop a full blown complex. One day, my friend Sandy must have felt sorry for me. She offered to trade sandwiches. That meant the world to me. Sandy’s family owned an Italian deli and she always had the most beautiful sandwiches. I don’t remember anything beyond that moment, just that she made me feel like less of a freak!

So, it’s not like I think I have any claim to hummus, but do I feel like it’s mine. I’m kidddddding! A little. It’s just that this is the type of food that was a staple in our home and back then, I felt like an oddball eating it! Now, it’s everywhere. Hummus is so popular that some tobacco farmers are switching to farming chickpeas instead of tobacco! So, I kind of feel like, well, my hummus is pretty darn good. Who knew that some of my most major hangups over food would pay off someday?

One of the wonderful things that has come to me because of my crazy relationship with food is this blog. Over the past few months, I’ve seen it grow and I’ve been hearing really sweet things from my awesome readers. You’ve all been so kind and supportive, I’d like to give a little something to you! Enter to win a $25 gift card to Bed Bath and Beyond courtesy of Taste Love & Nourish. I know I can always find a little something every time I go there! I love that store! Enter below! Good luck and thank you!

Hummus

Hummus

1 29 oz. can chickpeas, drained and rinsed well
1/3 C. tahini
juice of one lemon
zest of 1/2 lemon
up to 1/3 C. water (start with less and add a bit more if you need to thin it out)
2 T. extra virgin olive oil + more for drizzling on top
3/4 t. salt
a bit of black pepper
1/4 t. cumin
1 clove garlic, minced
sprinkling of crushed red pepper flakes
toasted or grilled pita bread or assorted veggies for serving

Combine the ingredients up to the garlic in the bowl of a food processor. Process until smooth. Spoon into a serving bowl and drizzle with more olive oil and sprinkle with some crushed red pepper flakes.

Notes:

  • I don’t add a lot of olive oil while processing. I feel like the flavor of the oil gets lost. I like to use the best quality extra virgin olive oil I can and use it more as a garnish. That way you really taste the fruity flavor on your tongue.
  • I don’t use a ton of fresh garlic in this for a reason. I think raw garlic can be overwhelming. If I roast garlic beforehand, I add a lot more than the one clove. Roasted garlic is mellow, sweet and delicious. To roast a head of garlic, cut a bit of the top off to expose the cloves, place the garlic in a bit of aluminum foil, drizzle with a tiny, tiny bit of olive oil and roast in an oven preheated to 350 degrees for about 30 to 45 minutes, depending on the size of the garlic. To test, just give it a light squeeze. If it’s softened, it’s done!
Hummus


BedBathBeyond

a Rafflecopter giveaway

Blueberry Crisp

Blueberry Crisp
Blueberry Crisp

There is something about a blueberry crisp that makes me feel like spring has arrived. Blueberries, in general, remind me of spring and summer. But, eating this, hot out of the oven, with a scoop of vanilla ice cream on a cool spring night can be blissful. Now, I’m not out to spoil your bliss by telling you that this recipe is a lot lighter and healthier than most crisps or crumbles…but…it is. Hey, I still use some buttah and sugah…so trust me on this…it’s yummy…and blissful!

Blueberry Crisp


Blueberry Crisp

Topping
1 C. oats
1/3 C. dark brown sugar
1 T. flour
3 T. ground flaxseed meal
1/4 C. chopped walnuts or pecans
2 t. cinnamon
1/4 t. nutmeg
dash of fine salt
3 T. butter, softened just a bit

4 C. blueberries, fresh or frozen
2 T. flour
2 – 3 T. dark brown sugar (depending on the sweetness of your blueberries)
zest from 1/2 of a small orange (optional)
1/2 t. cinnamon
1/8 t. nutmeg

Preheat your oven to 375 degrees. Lightly butter a baking dish (use one that is about 8 to 10 inches wide, mine is 10×7 1/2…it won’t make a big difference with this recipe).

In a small bowl, combine the topping ingredients. Using a pastry cutter or a large fork, cut the dry ingredients into the butter until the mixture is crumbly. Set aside.

Combine the filling ingredients in a large bowl and gently toss until combined.

Pour the filling into the prepared baking dish. Top with the topping and bake for about 30 minutes or until the top has become golden and crisp and the blueberries are bubbling underneath.

You can allow it to cool a bit before serving…I can never wait! If you’d like, serve with a lower fat vanilla bean ice cream! Bliss.


Notes:

  • If your blueberries are frozen, you don’t need to defrost them first. Just use them as is. Frozen berries will give you a bit more watery end result, but I’m OK with that. You can always add another tablespoon of flour to the mixture if you are concerned about that.


Blueberry Crisp


Blueberry Crisp


Spring Trees
I just wanted to share one more thing that reminds me that spring is finally here…these trees near my home…they make me happy!


5 Recipes for Cinco de Mayo

5 Recipes for Cinco de Mayo

I’m Armenian, but sometimes I swear there’s got to be some Hispanic relative in my lineage! I LOVE LOVE LOVE Mexican food! I could eat it every day. My daughter does too. Between the two of us, we pretty much turn everything into either a taco, a fajita or a burrito.

In case you thought Cinco de Mayo was just another excuse to make a margarita…uh, it’s not. Not completely, anyway. Cinco de Mayo celebrates that day in 1862, when the Mexican army won the Battle of Puebla against an invasion by the French army. I’m not taking sides, but apparently Mexico was the underdog. I’m a sucker for an underdog.

Here is my roundup of five caliente recipes and one frío margarita…

Tortilla Soup

Tortilla Soup


Steak Fajitas with Avocado Lime Crema

Steak Fajitas with Avocado Lime Crema


Black Bean and Lentil Chili

Black Bean and Lentil Chili


Chipotle Grilled Salmon with Pineapple Avocado Salsa

Chipotle Grilled Salmon with Pineapple Avocado Salsa


Red Quinoa and Mango Salad

Red Quinoa and Mango Salad


Frozen Pineapple Margarita

Frozen Pineapple Margarita


Disclaimer: This post was written after performing quality control on the above margarita. The writer (that’s me) cannot be held accountable for any typos, misinformation or lousy photography.

Frozen Pineapple Margarita

Frozen Pineapple Margarita

With Cinco de Mayo coming up this weekend, I thought it would be nice to put a spin on a margarita. Well, that’s partly true. I really had this poor, sad, forgotten pineapple just sitting all alone on my counter (we can address my produce addiction another time). Now, I’m not telling you to use a rotten pineapple, but if it’s just a bit too ripe, cut it up into cubes, lay them out on a baking sheet lined with waxed paper and throw them in the freezer until frozen. From there you can use some to whip up this drink then put the rest in a zipper bag and back into the freezer for future margaritas or smoothies. Cheers!

Frozen Pineapple Margarita

about 6 ice cubes
2 C. frozen cut pineapple
1 C. orange juice
1 – 2 T. honey or agave (depending on the sweetness of your pineapple)
juice and zest of one lime
1/2 c. tequila
1 T. triple sec
turbinado sugar for serving
lime wedge for serving

Put all ingredients into the blender. Blend on high speed for about one minute. If you’d like to rim the glasses with the turbinado, fill one shallow dish with water and one with some sugar in it. Dip the glass into the water. Let the excess drip off, then dip into the sugar. Pour the margarita into chilled margarita glasses and garnish with a wedge of lime.

Serves about 4 margaritas.


Roasted Herbs de Provence Chicken

Roasted Herb de Provence Chicken
Roasted Herbs de Provence Chicken

I love roasting whole chickens. They are kind of like a blank palette. By just putting your favorite flavors together and following some basics, it becomes almost fool proof. I like to try new things all the time, but this is pretty much my basic standard roasted chicken. It’s herby and flavorful, but not overpoweringly so.

If you are not familiar with Herbs de Provence, you should give it a try. Herbs de Provence was first combined in the seventies. It was a mixture of herbs usually found in the Provence region of France. There is no standard recipe for Herbs de Provence. There are many variations as there are with curries. The mix can include any or none of the following: thyme, basil, savory, fennel, rosemary, oregano, marjoram or tarragon…and sometimes lavender. If you shop around and read ingredients, you’ll find no two bottles include the same variations. I always look for the ones that include lavender. Lavender may be the ingredient that drew me in the first time I ever opened a jar and smelled it. The funny thing is, the original mixture did not include the lavender. Lavender was added later to mixtures sold in the US. It appealed to our image of the fragrant fields of lavender in Provence. My personal favorite blend is this one from Williams-Sonoma.

Roasted Herbs de Provence Chicken

1 whole roaster chicken, 5 to 7 pounds, giblets removed, rinsed and dried well
1 T. olive oil
2 t. Dijon mustard
1 clove garlic, finely minced
1 t. onion, finely minced
1 t. Herbs de Provence
1/4 t. poultry seasoning (optional)
1 t. kosher salt
1 t. freshly ground black pepper

Preheat your oven to 450 degrees. Place the dried chicken in a large roasting pan.

In a small bowl, combine the remaining ingredients. Gently slide a spoon between the breast meat and the skin to separate the two. Do this on each side. Then using about 1 or 2 teaspoons per side, put some of the mixture under the breast skin and rub it around (this is totally optional). Use the remaining mixture to rub all over the rest of the bird. Also optional, you can tuck the wings under the bird so that the tips don’t burn and tie up the legs with some kitchen twine to cook more evenly (trust me…it’ll be just as wonderful if you skip that step)!

Put the chicken in the oven and reduce the temperature to 375 degrees. Cook about 20 minutes per pound. For a 6 to 6.5 pound chicken, roast for about 2 hours. To test doneness, I’m terrible about using a meat thermometer. I just grab the end of the leg, wiggle it a bit and if it wiggles…it’s done. That’s how technically savy I am!

When the chicken is done, remove it from the oven and allow it to sit for at least 15 to 20 minutes. Trust me…waiting even a bit longer is better. The chicken will be moist and it will be so much easier to carve.


Notes:

  • So, carving? I’m no expert, but I do think there is a really great way to carve the breast. I like to remove the whole breast by cutting down along the body, then slicing the whole breast in slices on the cutting board. It looks much nicer that way.
  • Use the pan drippings to make an awesome gravy and serve with mashed potatoes and your favorite veggies!
  • If you like your chicken with a crispy skin, this recipe will make you happy! Starting off with a dry chicken and that high heat of the oven will ensure crispiness!
  • The poultry seasoning is optional in this. I sometimes add it…or not. It adds a little more of an earthy-herby flavor.
  • Go ahead and toss some bay leaf, lemon peel or onion into the cavity if you like. It all adds a bit of flavor. Just don’t stuff it too much, that will change your cooking time.